A user with the appropriate ticket project administrator role can create a new ticket project in K-Fuze.
- Expand Administration and click Ticketing.
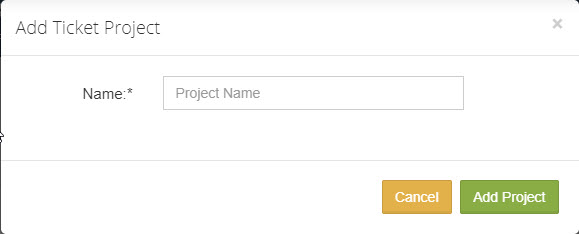
- Click Add New Project.
- In the Name field, enter the name of the new project and click Add Project.
- Optionally enter the necessary information in the Description, Image URL, and Image Style fields.
- The Manager drop down is automatically populated by the creator of the project. To change the manager, click the drop down and select the name of the person to set as the project manager.

- Activate the Notify Manager slider to automatically send an email to the project manager whenever changes within the project such as tickets occur.
- From the Email Address To Use drop down, select the manager's email address for all communication. Typically the available options are Email Address and Alternate Email Address.
- From the Display Project Users in Requestor List drop down, select the appropriate option.
- Include: To include the project users in the Requestor list.
- Exclude: To exclude the project users from the requestor list.
- From the Text Only Editor drop down, select the checkbox(es) to include in the project.
- Click the Active slider to activate the project. Once it is active the button is green displaying On.
- From the Components/Tabs drop down, select the Components to activate for the ticket pages of the project. The available options are:
- Attachments
- Time Tracking
- Related Tickets
- Notifications
- Comments
- Optionally, from the Encryption drop down, select the fields to encrypt.
- From the Emails drop down, select whether to Allow Agent Emails, Enable Emails to this Project, Enable Read-Only Emails.
- When finished updating the properties tab, click the Roles tab.
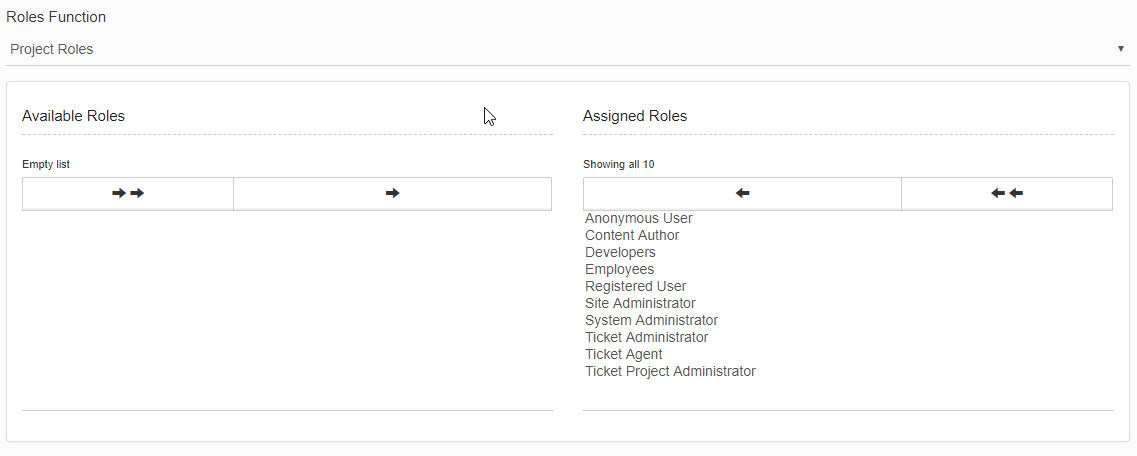
- From the Roles Function drop down, make sure Project Roles are already selected.
- From the Available Roles list box, select the roles to assign to the ticket project. To select multiple roles, hold down the Ctrl Key and click on each of the role to add. Then click the single arrow.
- From the Roles Function drop down, select Project Administration Users.
- In the Select a User field, start typing the name of the user to set as the project administrator. Once the name is displayed in the list, select it. Repeat this step as needed to add multiple users.
- From the Roles Function drop down, select Project Agent Users and repeat step 18.
- Click Save.
- Click the Notifications tab to select the user(s) to add to the ticket notification list of tickets created within this project. Users added to the notification tab of the project, no longer need to be added to the notification list of individual tickets.
- Click Save.
- Click the Ticket Fields tab to set the layout of the ticket page. A default panel is automatically added to the layout.
- To add a new field or panel, click Add New Field/Panel and make the appropriate selection.
- Click the Events tab to add triggering events to the ticket page.