Create a New Content Item
Overview
This FAQ describes how to create a new content item.
Steps
- Expand Administration, select Content, and click on Add New Content. Alternatively from the Content List page, click the Add New Content (+) button.
- In the Title field, enter a title for the new content being created. As the title is being entered, the Friendly URL field is automatically populated. It can be changed if needed using the Allow Edit checkbox.
- Optionally enter a description of the content in the Description field.

- In the Allow area, select any or all of the Comment, Rating, Sharing, and Allow Following sliders to enable those fields on the content page.
- Comment slider: Displays the comments section on the content page.
- Rating slider: Enables content rating for the page.
- Allow Following slider: Enables the content to be followed by users.
- Sharing slider: Enables the sharing controls so users can share the content on different social media platforms.
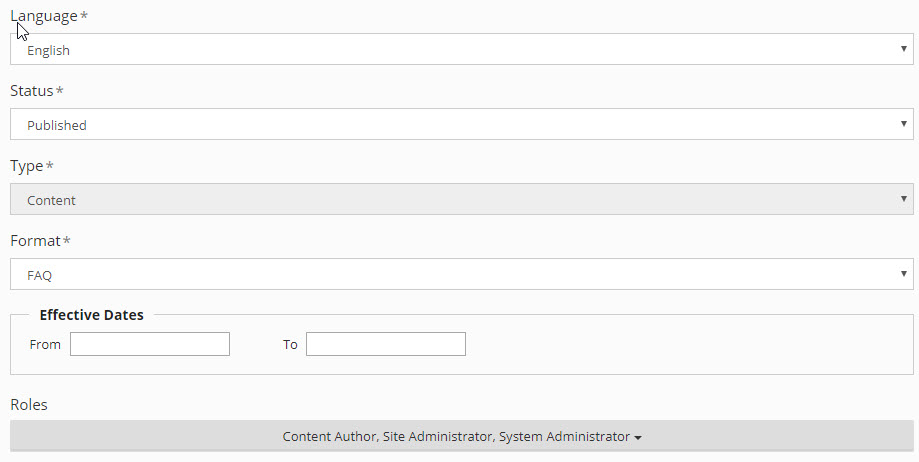
- The Language drop down is set by default to English.

- From the Status drop down, select which status to set the content to. Only the Published status makes the content visible to its intended audience.
- From the Type drop down, select Content.
- From the Format drop down, select the format to tag the newly created content with. Format types range from Audio & Blog to Web Page & White Paper formats, so make sure to select the format that best describes the content item you're looking to create.
- Optionally, under Effective Dates you can choose dates in the From and To fields to enable the content for a specific period of time.
- From the Roles drop down, select the intended audience that you want to be able to view the content.
- Click Save towards the bottom of the page to create the new content item. Once saved, the page reloads and different tabs become available to add information to.
- From here, click on the Content tab. In the provided editor, enter the content to be displayed.
- Next click the Tagging tab.

- In the Keyword Tags field, enter the keywords by which to tag the content item, making it searchable.
- In the Content Category Tags list, select the categories to associate with the content.
- Click the Notifications tab to add users to the content notification list. Whenever the content is changed or modified, users on the notification list will receive an email.
- Remember to click Save when you're finished.
- To preview the newly created content, click View.
The page you are trying to view has expired and is no longer available for viewing.